2017年06月09日(金) [長年日記]
■ [c#] WPFでHello World
VisualStudio 2015を使ってWPFアプリケーションを作ろうとしている。難しいのでメモしていきたい。
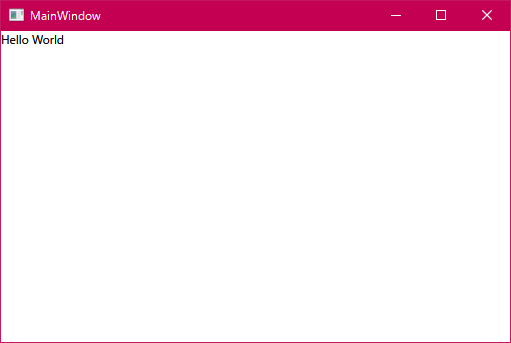
まずはHello World。出来上がりはこれだ。

MainWindow.xaml
<Window x:Class="Hello.MainWindow"
        xmlns="http://schemas.microsoft.com/winfx/2006/xaml/presentation"
        xmlns:x="http://schemas.microsoft.com/winfx/2006/xaml"
        xmlns:d="http://schemas.microsoft.com/expression/blend/2008"
        xmlns:mc="http://schemas.openxmlformats.org/markup-compatibility/2006"
        xmlns:local="clr-namespace:Hello"
        mc:Ignorable="d"
        Title="MainWindow" Height="350" Width="525">
    <Window.DataContext>
        <local:MainWindowViewModel/>
    </Window.DataContext>
    <Grid>
        <TextBlock x:Name="textBlock" Text="{Binding Text}"/>
    </Grid>
</Window>
- MVVMにしたいのでViewModelクラスを参照する。ViewとViewModelの結合をどう実現するのがいいのかまだよくわからないが、XAML上で指定するのが一番わかりやすい気がするので <Window.DataContext> を使ってViewModelクラスを指定した。
- ウィンドウにはテキスト表示用にTextBlockを置いた。
- TextBlockのTextプロパティにViewModelとのバインディングを記述した。「{Binding Text}」と書くと、DataContextに指定したクラスのインスタンスのTextプロパティの値が設定される。
MainWindowViewModel.cs
namespace Hello
{
    class MainWindowViewModel
    {
        public string Text => "Hello World";
    }
}
- ViewModelクラスは今の所何も継承しなくていいはず。Textプロパティを定義した。
上記2つのファイルを編集・作成すればアプリケーションが完成する。
[ツッコミを入れる]
2017年06月12日(月) [長年日記]
■ [c#] WPFでICommandとINotifyPropertyChangedを使う
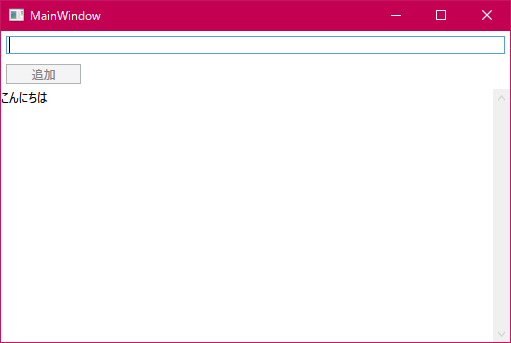
WPFではボタンやメニューをクリックしたときにICommandを実装したクラス(コマンド)のメソッドを呼び出す仕組みがある。また、INotifyPropertyChangedを実装することでViewModelの状態変化をViewへ通知することができる。これらの機能を使った次のプログラムを作ってみた。

- 追加ボタンをクリックするとテキストボックスの内容を画面下部に追加する。このときテキストボックスの内容はクリアする。
- テキストボックスが空だとボタンはクリックできない。
MainWindow.xaml
<Window x:Class="Hello.MainWindow"
        xmlns="http://schemas.microsoft.com/winfx/2006/xaml/presentation"
        xmlns:x="http://schemas.microsoft.com/winfx/2006/xaml"
        xmlns:d="http://schemas.microsoft.com/expression/blend/2008"
        xmlns:mc="http://schemas.openxmlformats.org/markup-compatibility/2006"
        xmlns:local="clr-namespace:Hello"
        mc:Ignorable="d"
        Title="MainWindow" Height="350" Width="525"
        FocusManager.FocusedElement="{Binding ElementName=textBox}">
    <Grid>
        <Grid.RowDefinitions>
            <RowDefinition Height="Auto"/>
            <RowDefinition Height="Auto"/>
            <RowDefinition/>
        </Grid.RowDefinitions>
        <TextBox x:Name="textBox"
                 Height="18" Margin="5" VerticalAlignment="Top"
                 Text="{Binding InputText, UpdateSourceTrigger=PropertyChanged}"/>
        <Button x:Name="button" Content="追加" Grid.Row="1"
                Width="75" Height="20" Margin="5"
                HorizontalAlignment="Left" VerticalAlignment="Top"
                Command="{Binding AddCommand}"/>
        <ScrollViewer Grid.Row="2">
            <TextBlock x:Name="textBlock" Text="{Binding Message}"/>
        </ScrollViewer>
    </Grid>
</Window>
- 前回はDataContextをXAML上で指定したけど、これだとモデルが複雑になったときにうまくいかない気がしてきたので指定しないようにした。DataContextは後述のApp.xaml.cs上で指定する。
- 起動時にTextBoxにフォーカスを当てるよう、Window要素にFocusManager.FocusedElement属性を指定してみた。
- TextBoxのテキストが変化する度にViewModelが更新されるよう、TextBoxのText属性にて UpdateSourceTrigger=PropertyChanged を指定した。
- ButtonのCommand属性にAddCommandを指定した。これによりこのボタンとViewModelのAddCommandプロパティで参照できるコマンドが関連づく。
- TextBlockをScrollViewerで囲い、TextBlockのテキストが長くなった時にスクロールできるようにした。
App.xaml
<Application x:Class="Hello.App"
             xmlns="http://schemas.microsoft.com/winfx/2006/xaml/presentation"
             xmlns:x="http://schemas.microsoft.com/winfx/2006/xaml"
             xmlns:local="clr-namespace:Hello"
             Startup="onStartup">
    <Application.Resources>

    </Application.Resources>
</Application>
- VisualStudioの生成するApp.xamlはApplication要素のStartupUri属性でXAMLファイルを指定しているが、それを削除しStartup属性を指定するように変更した。これで起動時にHello.AppクラスのonStartup()が呼ばれるようになる。
App.xaml.cs
using System.Windows;

namespace Hello
{
    /// <summary>
    /// App.xaml の相互作用ロジック
    /// </summary>
    public partial class App : Application
    {
        private void onStartup(object sender, StartupEventArgs e)
        {
            var mh = new MessageHolder("こんにちは");
            var w = new MainWindow();
            w.DataContext = new MainWindowViewModel(mh);
            w.Show();
        }
    }
}
- AppクラスにonStartup()を追加し、ここでMessageHolder(モデル)、MainWindowViewModel(ビューモデル)、MainWindow(ビュー)を生成して関連づけるようにした。
MessageHolder.cs
namespace Hello
{
    class MessageHolder
    {
        public MessageHolder(string initialMessage)
        {
            Message = initialMessage;
        }

        public string Message { get; set; }
    }
}
- モデルクラスを作った。文字列をプロパティに持つだけ。
MainWindowViewModel.cs
using System.ComponentModel;
using System.Runtime.CompilerServices;
using System.Windows.Input;

namespace Hello
{
    class MainWindowViewModel : INotifyPropertyChanged
    {
        private MessageHolder messageHolder;
        private ICommand addCommand;

        public MainWindowViewModel(MessageHolder mh)
        {
            messageHolder = mh;
            addCommand = new DelegateCommand(
                () =>
                {
                    Message = InputText + "\n" + Message;
                    InputText = "";
                    NotifyPropertyChanged(nameof(InputText));
                },
                () => { return !string.IsNullOrEmpty(InputText); });
        }

        public string Message
        {
            get { return messageHolder.Message; }
            set
            {
                messageHolder.Message = value;
                NotifyPropertyChanged();
            }
        }

        public string InputText { get; set; }

        public ICommand AddCommand => addCommand;

        public event PropertyChangedEventHandler PropertyChanged = delegate {};

        private void NotifyPropertyChanged([CallerMemberName] string name = "")
        {
            PropertyChanged(this, new PropertyChangedEventArgs(name));
        }
    }
}
- ViewModelはINotifyPropertyChangedを実装するようにした。最後にある NotifyPropertyChanged() を呼ぶと状態の変化がViewへ通知される。
- NotifyPropertyChanged()の引数には[CallerMemberName]属性を指定した。こうすると呼び出し元のメソッドorプロパティ名が設定されるみたい。
- フィールドaddCommandに後述するDelegateCommandのインスタンスを設定している。これをAddCommandプロパティで公開しViewがそれを参照している。
DelegateCommand.cs
using System;
using System.Windows.Input;

namespace Hello
{
    class DelegateCommand : ICommand
    {
        private Func<bool> canExecute;
        private Action execute;

        public DelegateCommand(Action execute) : this(execute, () => true) {}

        public DelegateCommand(Action execute, Func<bool> canExecute)
        {
            this.execute = execute;
            this.canExecute = canExecute;
        }

        public event EventHandler CanExecuteChanged
        {
            add { CommandManager.RequerySuggested += value; }
            remove { CommandManager.RequerySuggested -= value; }
        }

        public bool CanExecute(object parameter)
        {
            return canExecute();
        }

        public void Execute(object parameter)
        {
            execute();
        }
    }
}
- コマンドの処理はViewModelのメソッドで処理するのが手軽なので、それを実現するためのコマンドDelegateCommandを定義する。MVVMフレームワークを使う場合はフレームワークが同様のクラスを用意しているみたい。
- ICommandで受け取れるパラメータはobject型なので使いづらい。なのでパラメータは使わないようにしている。コマンドの状態は処理が移譲されるViewModelの状態から取得する想定。
- ICommandはCanExecute()を持つが、これが有効に機能するにはこのメソッドの返す値が変わったときにコマンドの送信元(今回の場合はButton)に状態変化を通知する必要がある。で、上では状態通知のイベントハンドラをCommandManagerに登録しているが、こうすると自動的に状態変化通知がされるみたい。仕組みがよくわからないけれど適切なタイミングでポーリングしているのだろうか。
TODO CommandManager.RequerySuggestedはハンドラを弱参照で持つからハンドラがGCで回収されてしまわないように気をつけろという注意が書かれていた。修正しないと駄目そう。- 別に問題ない気がしてきた。DelegateCommandへイベントハンドラを登録するのはボタンなどのWPFのコンポーネントで、これらはイベントハンドラへの参照を保持しているはずだと思う。もし問題が発生したら調べる。
[ツッコミを入れる]