2014年01月08日(水) [長年日記]
■ [java] JavaFXでプログラム終了処理
JavaFX 2で始めるGUI開発 第3回 コントロール その1とJavaFX 2で始めるGUI開発 第4回 コントロール その2を読んだ。基本的なコントロールが色々紹介されている。Swingとほぼ同じかなという感想。
気になったのは、「JavaFXのアプリケーションを終了させるためには、javafx.application.Platformクラスのexitメソッドをコールします。」という所。PlatformクラスというのはSwingUtilitiesみたいなクラスだった。そのexitメソッドは
If this method is called after the Application start method is called, then the JavaFX launcher will call the Application stop method and terminate the JavaFX application thread.
ということで、System.exit()を呼ぶのとは違いアプリケーションの終了時処理を行う余地があるということかな。試してみたくなったので、終了するだけのアプリケーションを作ってみる。
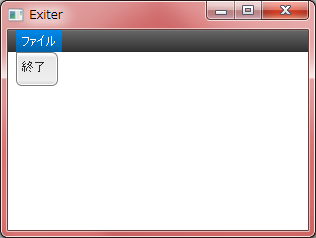
できあがり

メニューバーは黒いのか。丸角なのはイマイチ。
- ファイルメニューの終了を選ぶと終了する。
- 閉じるボタンなどでウィンドウを閉じようとしても終了しない。
と動作する。以下ソースコード。
メインクラス
package exit;

import java.io.IOException;
import javafx.application.Application;
import javafx.event.EventHandler;
import javafx.fxml.FXMLLoader;
import javafx.scene.Parent;
import javafx.scene.Scene;
import javafx.stage.Stage;
import javafx.stage.WindowEvent;

public class Exiter extends Application {
    @Override
    public void start(Stage primaryStage) throws IOException {
        Parent root = FXMLLoader.load(getClass().getResource("Exiter.fxml"));
	primaryStage.setScene(new Scene(root));

        primaryStage.setOnCloseRequest(new EventHandler<WindowEvent>() {
            @Override
            public void handle(WindowEvent t) {
                System.out.println("handle " + t.getEventType());
                t.consume();
            }
        });

	primaryStage.setTitle("Exiter");
	primaryStage.show();
    }

    @Override
    public void stop() {
        System.out.println("stop Exiter");
    }

    public static void main(String[] args) {
	launch(args);
    }
}
- ウィンドウを閉じる動作では終了しないようにするため、Window#setOnCloseRequest()でイベントハンドラを設定し、その中でEvent#consume()を呼ぶようにしてみた。
- Application#stop()をオーバーライドしてこのメソッドが呼び出されていることを確認。
コントローラクラス
package exit;

import javafx.application.Platform;
import javafx.event.ActionEvent;
import javafx.fxml.FXML;

public class ExiterController {
    @FXML
    public void handleExit(ActionEvent event) {
        Platform.exit();
    }
}
- 終了メニューが選ばれたときのイベントハンドラを実装しているだけ。Platform.exit()を使う。
FXML
<?xml version="1.0" encoding="UTF-8"?>

<?import javafx.scene.control.Menu?>
<?import javafx.scene.control.MenuBar?>
<?import javafx.scene.control.MenuItem?>
<?import javafx.scene.layout.BorderPane?>

<BorderPane prefHeight="200" prefWidth="300"
            xmlns:fx="http://javafx.com/fxml"
            fx:controller="exit.ExiterController">
  <top>
    <MenuBar>
      <menus>
        <Menu text="ファイル">
          <items>
            <MenuItem text="終了" onAction="#handleExit" />
          </items>
        </Menu>
      </menus>
    </MenuBar>
  </top>
</BorderPane>
- 連載のサンプルの真似。前回まではルート要素がAnchorPaneだったけど、今回はBorderPaneを使っている。
追記
終了のフックについての記事があったのでリンクしておく。setOnCloseRequest()を使うのはよくないのかも。
■ [c++] Boost Timerで時間を計る
Boost Timerは以前使ったことがあるのだけれど、もう一度使おうとしたら何も覚えていなかったのでサンプルをメモ。
#include <chrono>
#include <iostream>

#define _GLIBCXX_USE_NANOSLEEP
#include <thread>
#undef _GLIBCXX_USE_NANOSLEEP

#include <boost/timer/timer.hpp>

int main() {
  boost::timer::auto_cpu_timer timer0;
  boost::timer::auto_cpu_timer timer1;

  timer0.start();
  std::this_thread::sleep_for(std::chrono::seconds(1));
  timer0.stop();

  timer1.start();
  std::this_thread::sleep_for(std::chrono::seconds(2));
  timer1.stop();

  timer0.resume();
  std::this_thread::sleep_for(std::chrono::seconds(3));
  timer0.stop();

  std::cout << "timer0: ";
  timer0.report();
  std::cout << "timer1: ";
  timer1.report();
}
timer0:  4.000136s wall, 0.000000s user + 0.000000s system = 0.000000s CPU (n/a%)
timer1:  2.000066s wall, 0.000000s user + 0.000000s system = 0.000000s CPU (n/a%)
- ヘッダオンリではなくビルド時に libboost_timer をリンクする必要がある。
- auto_cpu_timerクラスを使うと、経過時間・ユーザ時間・CPU時間を計ってくれる。
- インスタンスを作っただけで計測は開始されている。
- start()でゼロから計測を開始。
- stop()で計測を停止。
- resume()で計測を再開。
- report()で結果を出力。
ついでにC++11の<chrono>と<thread>を初めて使ってみたけれど、古いGCCだとマクロを定義しないとstd::this_thread::sleep_for()を使えないみたいだった。